30 August 2012

'Marry Me'

There just aren't enough hours in the day!
Trying not to get distracted from my quilling samples but my order of Christmas Boofle & Michael Powell came today - I may have to relapse a little at the weekend, they are so lovely.


I have made 2 of these cards for a request this week.

Stamp is from 'Marry Me' Su set, stamped in Bravo Burgundy ink,
mounted on burgundy & gold card.

Congratulations sentiment from Forever Friends wedding set and also double mounted.

I then rather painstakingly made a pile of burgundy quilled folded roses to add as a border and quilled some little leaves and a few tendrils to finish off.

Snowflakes

Another quick post - sorry!

These are a couple of quilled snowflakes I've mounted on cards for one of the many September Quilling events!

They are just simple shapes - a tight coil in the centre and teardrops in 2 colours.  The turquoise is a fabulous shade and the black is pearlised paper which you really have to see for real!

These are beginner snowflakes - I'm working on some more fancy filigree ones to show the range of options.

These are mounted on shapes cut using Papermania dies in matching card colour and a stamped greeting from the first issue of Creative Stamping.

24 August 2012

Rabbit

And another request ...

This is a lovely Woodland Folk rabbit from the decoupage set.

I've mounted him in a scalloped circle and added to a card which I've covered using a piece of paper from a Papermania pad.  

Using Stampin' Up Punch Potpourri I've stamped the flowers and punched out with the matching Boho Blossoms punch.

Peel offs layered on to matching card for a greeting.
Mainly on to Quilling now for many events in September - amazing how many other things you suddenly find you want to do when you should be doing something else!

23 August 2012

Reason to Smile card

Just a little card today I've just made at a little Stampin' Up evening I seemed to turn up at!

We got to use the lovely Reason to Smile stamp set that is on offer this month (and was already on my list).

It is a 2-step stamp but we just used one step today as there were quite a few of us having a go!

Coloured the image with SU pens (cherry cobbler & old olive) and stamped on to card which we daubed round the edge in soft suede ink.

Added a sentiment and then put it through the big shot with the square lattice embossing folder and mounted on to cherry cobbler card.

Quite a nice & effective little quick card and a lovely evening chatting with the crafty ladies.

22 August 2012

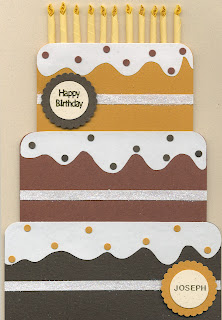
Birthday Cake

Another commission today.

This was a request for a boys 11th birthday.
He has been very ill recently and not allowed proper food, the day before his Birthday he was given the all clear to try some so I know his Mum made a cake - I hope he managed a little bit.

I was asked to make a cake card and somehow ended up with this giant!  The cake layers are made from strips of card I picked up at a show somewhere, they are lovely colours.  Icing is a strip of pearly white I've cut to fit and added sprinkles cut using the SU cupcake punch.

Icing is a strip of paper covered in glamour dust.

Couple of punches used to mount greeting & name peel offs on and then I felt I had to add 11 candles.  The flames are quilled and sat in a candle rolled from a square of paper.

21 August 2012

Colouring in!

A quick snap of the cards I made at a copic workshop on Sunday.
Christmas cards on the hottest day of the year was a little weird!

The poinsettia (apols for wonky background) was stamped using the pens directly on to a rubber stamp which gives a faster and different effect.

Santa was used as a subject because reds can be a little tricky and have a tendency to 'travel'.  It was almost too hot I think for blending as the colour dried too quickly but I will try & perfect the theory.  His jacket is a little unblended but everyone had the same issue.
Santa was coloured using 5 different shades of red, gradually building up the colour.
The ribbon & gems were also coloured using the pens, the background was also made using tape, glitter and pens again!  (funnily enough it took us ages to do this with chatting in between!).

The last cards purpose was 'colouring in gold' and uses a combination of pens which give a golden effect without just using a metallic pen.  I wasn't as sure of this image to start with but have grown to quite like it - another one to practice - had to buy the stamp obviously!

Have counted my copic pens after the course too - another £700 should finish the set!!! What have I started?

20 August 2012

Wedding Invitations

Hooray - I finished my 'project'.
The last couple of weeks has included some rather intensive Wedding Invitation making for some friends who booked the last spot at their venue of choice which means rather less notice for sorting everything out.

After going through some options on their choice of white, gold & burgundy this simple, elegant design is where we ended up.

The cards are 5" square and made from Centura Pearl card which has a gold fleck in which fitted in with a touch of sparkle the Bride wanted.  A strip of burgundy ribbon around the top of the card to match a layer of card with the 'Wedding Invitation' added on top stamped in gold and using a stamp from the Forever Friends 'Going to the Chapel' set.

As I do like to make things slightly difficult these invitations are pocketfold!

After much playing (yet again, thank goodness for my Simply Scored) I chose this size as it fitted in a sensible size envelope and it is made out of one piece of A4 card (with some trimmed off the side).  It is cut slightly larger than 5" so that I could trim down again to leave enough for tabs for the pocket.

I have just taken the names off the invite for various reasons.
The actual invite sits at the top, mounted on more of the burgundy card.
The pocket contains an RSVP, reply envelope and a little poem about gifts.
I made 50 invites altogether covering Wedding Day and Evening Invitations.  It was all done a little quicker than would of been preferable but that seems to be how things are done round here and I am really pleased with the result.

There will be some table numbers to follow in a couple of months time!

19 August 2012

Nearly there ...

I shall return with some pics tomorrow.  I finished my 'project' that has been keeping me quiet last night and today have been at another crafty learning experience so will have plenty to tell when I've sorted some pictures out - think I need a weekend to rest now!
Jill 

13 August 2012

So much to do ...

... so little time.

I have spent the last few days trying to perfect then cut and score my latest project - more to follow!

After spending Saturday crafting I really needed to do more on Sunday but it seemed a shame to be inside on a nice day.

My husband had a bike race near Wareham so I went to watch that in the fresh air and then we had tea in Corfe at the end of a lovely day - this was the view whilst we ate!

More crafty posts shortly.
Jill

7 August 2012

Casino Party

For anyone that has been keeping an eye on me for a while you may remember I made some party invites a few weeks ago.

The Birthday and party were last weekend so I thought I'd make a card to match the invites.

I made enough playing cards to spell out the name of the person concerned (with coloured peel offs) and added a punched heart or diamond to each one.
I had a spare cupcake from the invites (using SU stamps & punch again) to sit on the last one.

Because it was a party with a casino I've added a versamark embossed image of chips & cards from the previous issue of Creative Stamping in the corner and added a punched out sentiment (SU) in the top to finish.

Gift Bag


The final gift for a few days was a decorated gift bag.

I've punched the bottom of a piece of card with the SU eyelet border punch and added a strip of Papermania paper to the middle of it.

Then just finished off with more SU Mixed Bunch stamps and punch.
I've used Rich Razzleberry ink again and the matching sparkly card from my stash.  I've also added a little gold brad to the middle of each flower to hold them together.

SU bird punch for the leaves and bag is complete.


6 August 2012

Butterfly Card Box


I have also made this as a gift using Jenny's criss-cross box intstructions from the Flight of the Butterfly class.


How much easier this is to make with my Simply Scored!


Anyway, box decorated in some paper from a Papermania Rose Garden pack.
6 4x4" cards also decorated in bits of this paper, some matching pink & green card and a selection of stamps and punches from SU including Flight of the Butterfly and Butterfly Prints.

5 August 2012

Gift Bag

This is the first of a couple of gifts I have made in the last few days.  


This is made using the instructions Jenny gave us when we made one of these bags at our Summer Extravaganza.


A little scored box is encased within 2 large framelits which I've stamped with versamark using a Mixed Bunch stamp.


Because I'm not a fan of pink I found recently I didn't have any pink card when I wanted to do a baby card so had to buy a stash!  This is some lovely Anna Marie card.


A smaller framelit is placed on the bag with a Personal Impressions sentiment stamped on it.
Flower stamped in Rich Razzleberry and attached to a punched flower in a lovely sparkly card from the stash.


Leaves from SU bird punch and finished with a spiral rose & gem in the centre of the flower and some ribbon to close.  Turns out a bag of Thorntons truffles fits just right in this bag!

2 August 2012

Blue Butterflies

And for today's experiment a card we were shown at Newbury by Julie and I have noticed the technique appearing on quite a few blogs recently.


The dimensions I came across for it used a strange size card and as I wanted to keep to C6 I made up some for now.  It needs a little perfecting but I'm quite pleased with my first attempt.


I chose blue as I need to take a card featuring 'blues' to Crafty Bunch next week and have limited time to make too many but had to have a play!


All the layers of card are cut out and then the blue mats are removed, a little adhesive is added to the middle of each of the 3 cream layers just to keep them stacked (and the oval sentiment).  I used a stamp from the SU Vintage Vogue set and stamped across all the layers with Tempting Turquoise ink.  I then used a Craftwork Cards butterfly stamp and stamped this over the layers using Pacific Point ink.


Then I stuck the top 2 layers together and, for once, remembered to add some ribbon before sticking the last mat down.  This almost co-ordinating ribbon ended up in my stash from a wedding favour I think!


A bit of playing required with sizes to perfect it and all the different stamp options but one I will be trying again.